🌟 Elevate Your Outdoor Space with Style!
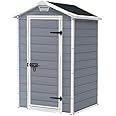
The Keter Manor Outdoor Garden Storage Shed is a stylish and practical solution for organizing your garden tools, BBQ equipment, and DIY essentials. With a traditional wood effect exterior, this shed fits perfectly in small spaces while offering a generous 1800-liter capacity. Its durable, weather-resistant resin construction ensures longevity, and the built-in ventilation keeps your items fresh. Plus, the optional padlock hasp adds an extra layer of security.
| Product Dimensions | 103 x 129 x 196 cm; 29 kg |
| Part number | 235002 |
| Item display height | 196 centimetres |
| Item display length | 128 centimetres |
| Item display width | 94 centimetres |
| Item display weight | 29 Kilograms |
| Material type | Plastic |
| Manufacturer | keter |
| Item model number | 17192190 |
| ASIN | B00BI0VPIW |
D**H
Well designed, nicely machined, very solid & durable
I bought this item to house a washing machine and tumble dryer outside, to free up space in the kitchen.It arrives flat packed (obviously) and needs a fair bit of assembly. However, the instructions are clear and complete, every piece is stickered or stamped with its part code (meaning it's quite easy to find the right parts), including the screws, and it's machined to fit together very well with no adjustment or cutting needed. The manufacturer even includes a spadger to make sure the corrugated plastic panels fit inside the corner pieces neatly.Once assembled it's sturdy and looks like it should last for years. Walls, floor and ceiling are all corrugated plastic, but this is pretty decent stuff and isn't going to bend, although if you were putting anything particularly heavy in there you might want to put some board on the floor. Reinforcement rods for the roof apex and hinge and latch points on the door are all supplied. There is provision for bolting it to a base, if you're not keeping anything heavy in it to weigh it down.The door is wide enough to get a washing machine in (600mm appliance), and high enough to squeeze a tumble dryer on top. However, the shed is not completely optimised for this use as the door is on the long wall - if it were on the short wall then you'd be able to use the space better for a washroom.Overall it's difficult to see how Keter could make this any better, unless they were to come round and assemble it for you themselves. If you're reasonably handy with DIY you should have no problem assembling it (although an electric screwdriver or drill with adjustable torque will make your life much easier - not an impact driver as it will destroy the plastic.) The instructions say that it needs two to build, but I built it on my own, struggling only with the roof where you really need somebody on the outside pushing down while a person on the inside uses the spadger to fit all the edges in neatly. The roof took more time than it would have done with 2, but it wasn't impossible.If there was a similar product better shaped for fitting a washing machine and dryer, I'd have gone for that, but otherwise this is a pretty decent product and I think most people aren't going to be disappointed.
S**E
Difficult to put together alone.
A lightweight but once constructed a solid shed. Best advice is build the floor, roof and door before doing anything else. Another tip is to loosely connect the 3 main walls before sliding down the wall with the door in it then screw everything tightly together as 3 walls tightly fixed together gives little margin for error and will make the fourth wall insertion harder.The instructions are decent and the spatula they supply makes fitting things together easier.Downside is the fact that you are screwing into virgin metal and plastic with no guide holes. If these were in the pieces ready it would make it so much better. I had an electric screwdriver but not powerful enough to start the holes so manually had to do the screws until they caught then moving to electric and finishing off manually (cue Carry On film laugh). A powerful electric screwdriver would be better but you'll have less control to start the holes, and they are a pain in the butt.The roof is impossible alone as one person needed outside and one inside. Once constructed, it looks good and will hopefully last a good number of years.
K**M
Fiddly assembly but good shed overall.
Firstly, as one or more previous reviewers have stated, you need to two drill drivers - one to predrill holes and the other for driving screws. If you only have a single drill/driver then this will drive you mad! Frankly, the lack of self cutting screws for the plastic panels is inexcusable for a product of this type and cost, especially in this day and age.I bought three of these and it took me over five hours to assemble the first one. The instructions tell you to insert the corner verticals and then slot in the panels in their upright position. After faffing about unsuccessfully with this, I found that it was much simpler and effective to assemble the corner verticals onto the side panels completely before inserting them into the base. A rubber mallet was also much more uaeful than the supplied spatula/spudger for this step.The next main problem I encountered was inserting the front panel (the one with the door aperture). The instructions (and even more than one YouTube video) tells you to simply slide the panel into the corner channels as the last vertical panel to go in. I have to disagree with this because the fit on mine was very tight (unlike the videos I had seen where they simply slotted in the panel like it was a loose slot fit). This part alone took me over an hour simply due to the tight fit of the corner extrusions over the plastic panels (and it was also very warm so the plastics were already quite pliable). After much cursing and the help of washing up detergent, I did manage to coax the front panel into position.I also had a problem with panel size tolerance. One of my side panels was slightly longer than the other, which caused a problem securing the bottom without warping/bending the bottom out of level.I also wasted a whole bunch of time trying to figure out how best to align slightly protruding panels (flush top or bottom). I decided to align tops, hoping for good roof fitment. In retrospect, I believe it would have been better to flush align panels on the bottom edges to ensure the base of all panels get fastened correctly without pulling the base out of level/flatness. The roof would be easier to jiggle to compensate.I did not experience the difficulties that other have had installing the roof. If you fit the front end first, tilted as illustrated, and using the spatula/spudger as needed then the roof should go on fairly uneventfully.After mounting the door hinges and bolt, I found that the so called reinforcement inserts for the door to be inadequate. They really need to be solid inserts instead of hollow moulded.I added my own mesh to the air vent apertures for improved insect screening.As a person in property maintenance, I am certainly no stranger to driving screws, and have done my fair share of driving hundreds of screws into floors and subfloors in a day. However, putting together one of these plastic sheds really pushed my patience with screwing stuff together - purely because they cheaped out on not providing self-cutting screws!I was hoping to get two of these built in a day but sadly only managed one. However, now knowing the installation foibles, I reckon I could put up each subsequent unit in less than three hours.All in all, it's an OK plastic shed for the money. It ia not difficult to assemble - just fiddly as heck! When you see the corrugated plastic panels you get a cheap and flimsy impression, but once fully assembled does feel sturdier than its constituent parts would suggest. Obviously, I am unable to comment on its longevity.
Trustpilot
1 month ago
3 weeks ago